It is sad to know that Steve Jobs is no more. I was reading the book "Inside the brain of Steve Jobs". It is not yet done. Only a few pages to go. A very inspirational man.
Wednesday, October 5, 2011

Friday, January 14, 2011
Integrating Quartz Scheduler with J2EE Web Applications.
Quartz is a full-featured, open source job scheduling service that can be integrated with, or used along side virtually any Java EE or Java SE application - from the smallest stand-alone application to the largest e-commerce system. Quartz can be used to create simple or complex schedules for executing tens, hundreds, or even tens-of-thousands of jobs; jobs whose tasks are defined as standard Java components that are programmed to fulfill the requirements of your application. The Quartz Scheduler includes many enterprise-class features, such as JTA transactions and clustering. Quartz .
*) Download :
To download Quartz, visit http://www.quartz-scheduler.org/download/ and download the most recent stable release.
*) Setup:
1) Using Maven.
If you are using Maven use this in your pom.xml
<dependency>
<groupId>org.quartz-scheduler</groupId>
<artifactId>quartz</artifactId>
<version>1.8.3</version>
</dependency>
2) Manually setting up the jar files.
Firstly, download and unzip Quartz and copy the quartz-all-*.jar to your WEB-INF\lib folder.
Then copy all the jar's from the unzipped quartz lib folder in as well.
You would find quartz-x.x.x.tar.gz in the download. Currently, the latest stable release is quartz-1.8.1.tar.gz.
For Quartz to work with your web application make sure you have all the dependent jars in the Applications classpath or the Servers classpath.
*) Integrating with your Web Application :
Quartz can be used as a Job scheduler with any Java EE compliant applications.
The scheduler can be started in many different ways.
Option 1) Using ServletContextListener :
You could start the scheduler when the Servlet Context is initialised. Most of the web applications already have a listener implemented to listen to Context initialised and destroyed events. If not, you could implement one as follows .
Make these entries in the web.xml.
<listener>
<listener-class>
listener.ServletContextAppListener
</listener-class>
</listener>
Assuming the User defined class ServletContextAppListener resides in the listener package of your web application.
public class ServletContextAppListener implements ServletContextListener {
Scheduler scheduler = null;
@Override
public void contextInitialized(ServletContextEvent pServletContext) {
try {
scheduler = (Scheduler) StdSchedulerFactory.getDefaultScheduler();
scheduler.start();
} catch (SchedulerException pScehdulerException) {
pScehdulerException.printStackTrace();
}
}
@Override
public void contextDestroyed(ServletContextEvent arg0) {
try {
scheduler.shutdown();
} catch (SchedulerException pScehdulerException) {
pScehdulerException.printStackTrace();
}
}
}
Now, when the Servlet container is init'ed the scheduler is started. It is a good time to set the scheduler in the ServletContext, so that they can be used in servlets (for example) to schedule jobs. We could setup the ServletContext in the Scheduler as well, so that the ServletContext is avaiable to the Scheduler and hence to the Jobs.
@Override
public void contextInitialized(ServletContextEvent pServletContext) {
Log("[STARTED] Context inited now");
try {
scheduler = (Scheduler) StdSchedulerFactory.getDefaultScheduler();
/* Setting the scheduler in the ServletContext */
pServletContext.getServletContext().setAttribute("scheduler", scheduler);
/* Set up the ServletContext in the SchedulerContext */
scheduler.getContext().put("servletContext", pServletContext.getServletContext());
scheduler.start();
} catch (SchedulerException pScehdulerException) {
pScehdulerException.printStackTrace();
}
}
You can now access the ServletContext from the Job as follows :
Option 2) Using the built in QuartzInitializerListener (is part of version 1.8.4 ? or later ) :
Using the QuartzInitializerListener is a more elegant way of starting Quartz scheduler than option 1, although it uses the above mechanism. You can use this mechanism by making the following entries in quartz.properties and web.xml.
quartz.properties
org.quartz.scheduler.instanceName = MyJobScheduler
org.quartz.scheduler.instanceId = 1
org.quartz.scheduler.rmi.export = false
org.quartz.scheduler.rmi.proxy = false
org.quartz.threadPool.class = org.quartz.simpl.SimpleThreadPool
org.quartz.threadPool.threadCount = 3
org.quartz.jobStore.class = org.quartz.simpl.RAMJobStore
# Add this to Configure Quartz to look in the quartz.xml for the job schedules
org.quartz.plugin.jobInitializer.class = org.quartz.plugins.xml.XMLSchedulingDataProcessorPlugin
org.quartz.plugin.jobInitializer.fileNames = quartz.xml
org.quartz.plugin.jobInitializer.failOnFileNotFound = true
org.quartz.plugin.jobInitializer.scanInterval = 120
web.xml
<listener>
<listener-class>
org.quartz.ee.servlet.QuartzInitializerListener
</listener-class>
</listener>
Instead of writing the listener (ServletContextAppListener), we use the built-in org.quartz.ee.servlet.QuartzInitializerListener class to handle the instantiation and starting of the scheduler. You could pass in some init parameters to control the way the Scheduler is created and started. They are explained below.
Make the following entries in web.xml
<context-param>
<param-name>config-file</param-name>
<param-value>quartz.properties</param-value>
</context-param>
<context-param>
<param-name>shutdown-on-unload</param-name>
<param-value>true</param-value>
</context-param>
<context-param>
<param-name>start-on-load</param-name>
<param-value>true</param-value>
</context-param>
<context-param>
<param-name>start-delay-seconds</param-name>
<param-value>10</param-value>
</context-param>
All of the above init parameters are self explanatory. The first parameter points to the config file for Quartz quartz.properties. The last one start-delay-seconds is important in situations where you want the scheduler to start after a certian period of time. Otherwise the jobs may run immediately ( if configured to run so ) on start up of the scheduler. So, it is advisable to give the servlet container and your application some time to settle down before scheduling jobs to run.
If you would like to have the scheduler injected into the ServletContext (as in option 1) you have to set another init parameter like below in web.xml :
<context-param>
<param-name>servlet-context-factory-key</param-name>
<param-value>schedulerFactory</param-value>
</context-param>
You can now access the Scheduler from the ServletContext like below from a servlet:
public class SomeServlet extends HttpServlet {
protected void doGet(HttpServletRequest req, HttpServletResponse resp) {
/* The schedulerFactory was injected into the ServletContext using the init parameters by QuartzInitializerListener */
SchedulerFactory lSchedulerFactory = (SchedulerFactory) .getSession().getServletContext().getAttribute("schedulerFactory");
if(lSchedulerFactory == null ) {
// Should not happen - Log an error and handle it
}
Scheduler lScheduler = null;
/* Get the scheduler from the factory */
try {
lScheduler = lSchedulerFactory.getScheduler();
} catch (SchedulerException pScehdulerException) {
// Should not happen - Log an error and handle it
pScehdulerException.printStackTrace();
}
// Setup the Job class and the Job group
JobDetail jobDetail = new JobDetail("EmailJob", Scheduler.DEFAULT_GROUP, EmailJob.class);
// Create a Trigger that fires every 5 minutes.
Trigger trigger = TriggerUtils.makeMinutelyTrigger(5);
// Setup the Job and Trigger with the Scheduler and schedule jobs
lScheduler.scheduleJob(jobDetail, trigger );
// The servlet execution continues normally independent of the job
....
*) Writing the job class:
Below is a simple example of how to write a job which can be scheduled on the Quartz scheduler.
You can convert a Java class into a Job which can be executed by the scheduler by making it implement the Job interface.
The Job interface is as below:
public interface Job {
public void execute(JobExecutionContext context)
throws JobExecutionException;
}
Implement a Job to send Emails once every 5 minutes.
*) Programmatic Vs Declarative scheduling
Jobs can be scheduled to run programatically or using configuration from the XML file. The advantage of using a Declarative approach (XML Config file) is you do not need to rebuild and deploy the application everytime you make a change to the XML Config file. So you can add, delete and modify jobs without rebuilding the application. A restart of the application is all it takes to get the changes working.
The job to schedule is EmailJob. In Quartz, there are 2 basic concepts :
1) Job : Creating the Job is the first step, but to get your Job called by the Scheduler, you need to indicate to the Scheduler how often,and at what time, your Job should be called. <BR>
2) Trigger :This is done by associating a Trigger to the Job. A Trigger has enough information about when to schedule a job. There is a utility class called TriggerUtils which is quite handy to create Triggers.
Option 1) Programmatic scheduling example.
The following example schedules a job from a Servlet. When jobs are started from a Servlet it does not run in the context of
the Servlet. This is one good reason not to create a Thread from a Servlet, which is not considered to be a good practice anyway.That is the reason we inject a reference to the Scheduler in the context initialised callback. Please note that without injecting the scheduler into the ServletContext you wouldn't have had access to it here unless you some other mechanism provided by the servlet container to access such resources.
// Get the scheduler which we setup in the ContextInitialised event
Scheduler lScheduler = (Scheduler)req.getServletContext().getAttribute("scheduler);
JobDetail jobDetail = new JobDetail("EmailJob", Scheduler.DEFAULT_GROUP, EmailJob.class);
// Create a Trigger that fires every 5 minutes.
Trigger trigger = TriggerUtils.makeMinutelyTrigger(5);
// Setup the Job and Trigger with the Scheduler
lScheduler.scheduleJob(jobDetail, trigger );
// The servlet execution continues normally independent of the job
....
Option 2) Declarative scheduling example.
The main reason you would take this approach is, it is easier to deploy the application without going for a a re-build. You can make the changes to the xml config file
and see the results with a restart of the server. In the previous example the job is scheduled from a servlet. It used Java code to setup the Job and Trigger with the Scheduler. The Quartz framework also supports setting up the Job schedule declaratively in XML files. A declarative approach allows us to more quickly modify which Jobs are being executed and when. You could change a job's trigger and make it run every 30 minutes from an hour without changing any source code.
The Quartz framework includes a "plugin" that reads an XML file containing Job and Trigger information upon startup of a Quartz application. All Jobs within the XML are added to the Scheduler, along with their Triggers. You will still have to write those java classes implementing the org.quartz.Job interface to do your work from within the job. Only thing that changes is the schedule these jobs run can be controlled externally via the XML file.
Following is a snapshot of <code>quartz.xml</code> which has a job (email-job) configured to run every 5 minutes using a cron expression. More on cron expressions here - Cron Expression Wiki
<?xml version='1.0' encoding='utf-8'?>
<job-scheduling-data xmlns="http://www.quartz-scheduler.org/xml/JobSchedulingData"
xmlns:xsi="http://www.w3.org/2001/XMLSchema-instance"
xsi:schemaLocation="http://www.quartz-scheduler.org/xml/JobSchedulingData http://www.quartz-scheduler.org/xml/job_scheduling_data_1_8.xsd"
version="1.8">
<schedule>
<job>
<name>email-job</name>
<group>EMAIL_JOBS_GROUP</group>
<description>Creates a PDF and persists the payload to the database</description>
<job-class>jobs.EmailJob</job-class>
<job-data-map>
<entry>
<key>SMTP_HOST</key>
<value>10.x.x.x</value>
</entry>
</job-data-map>
</job>
<trigger>
<cron>
<name>email-trigger</name>
<group>EMAIL_TRIGGERGROUP</group>
<job-name>email-job</job-name>
<job-group>EMAIL_JOBS_GROUP</job-group>
<!-- trigger every 5 minutes !-->
<cron-expression>0 */5 * * * ?</cron-expression>
</cron>
</trigger>
</schedule>
</job-scheduling-data>
The EmailJob is triggered every 5 minutes.
It is a good approach to wrap all the calls to the Quartz API, so that developers do not use it directly. Writing helper classes around the API could be useful for debugging and bookkeeping purposes. Hope this blog helped someone somewhere schedule jobs :) !
*) Download :
To download Quartz, visit http://www.quartz-scheduler.org/download/ and download the most recent stable release.
*) Setup:
1) Using Maven.
If you are using Maven use this in your pom.xml
<dependency>
<groupId>org.quartz-scheduler</groupId>
<artifactId>quartz</artifactId>
<version>1.8.3</version>
</dependency>
2) Manually setting up the jar files.
Firstly, download and unzip Quartz and copy the quartz-all-*.jar to your WEB-INF\lib folder.
Then copy all the jar's from the unzipped quartz lib folder in as well.
You would find quartz-x.x.x.tar.gz in the download. Currently, the latest stable release is quartz-1.8.1.tar.gz.
For Quartz to work with your web application make sure you have all the dependent jars in the Applications classpath or the Servers classpath.
*) Integrating with your Web Application :
Quartz can be used as a Job scheduler with any Java EE compliant applications.
The scheduler can be started in many different ways.
Option 1) Using ServletContextListener :
You could start the scheduler when the Servlet Context is initialised. Most of the web applications already have a listener implemented to listen to Context initialised and destroyed events. If not, you could implement one as follows .
Make these entries in the web.xml.
<listener>
<listener-class>
listener.ServletContextAppListener
</listener-class>
</listener>
Assuming the User defined class ServletContextAppListener resides in the listener package of your web application.
public class ServletContextAppListener implements ServletContextListener {
Scheduler scheduler = null;
@Override
public void contextInitialized(ServletContextEvent pServletContext) {
try {
scheduler = (Scheduler) StdSchedulerFactory.getDefaultScheduler();
scheduler.start();
} catch (SchedulerException pScehdulerException) {
pScehdulerException.printStackTrace();
}
}
@Override
public void contextDestroyed(ServletContextEvent arg0) {
try {
scheduler.shutdown();
} catch (SchedulerException pScehdulerException) {
pScehdulerException.printStackTrace();
}
}
}
Now, when the Servlet container is init'ed the scheduler is started. It is a good time to set the scheduler in the ServletContext, so that they can be used in servlets (for example) to schedule jobs. We could setup the ServletContext in the Scheduler as well, so that the ServletContext is avaiable to the Scheduler and hence to the Jobs.
@Override
public void contextInitialized(ServletContextEvent pServletContext) {
Log("[STARTED] Context inited now");
try {
scheduler = (Scheduler) StdSchedulerFactory.getDefaultScheduler();
/* Setting the scheduler in the ServletContext */
pServletContext.getServletContext().setAttribute("scheduler", scheduler);
/* Set up the ServletContext in the SchedulerContext */
scheduler.getContext().put("servletContext", pServletContext.getServletContext());
scheduler.start();
} catch (SchedulerException pScehdulerException) {
pScehdulerException.printStackTrace();
}
}
You can now access the ServletContext from the Job as follows :
public class EmailJob implements Job {
/* execute() is called by the scheduler once every 5 minutes */
@Override
public void execute(JobExecutionContext pJobContext) throws JobExecutionException {
....
/* Get the ServletContext set in the ContextInitialised callback above
/* Note: As i write this blog i do not have access to my code which works. I write this
looking up documentation from the Quartz website, there might be typos */
ServletContext lServletContext =
(Servlet Context)pJobContext.getScheduler().getContext().get("servletContext");
}
}
Option 2) Using the built in QuartzInitializerListener (is part of version 1.8.4 ? or later ) :
Using the QuartzInitializerListener is a more elegant way of starting Quartz scheduler than option 1, although it uses the above mechanism. You can use this mechanism by making the following entries in quartz.properties and web.xml.
quartz.properties
org.quartz.scheduler.instanceName = MyJobScheduler
org.quartz.scheduler.instanceId = 1
org.quartz.scheduler.rmi.export = false
org.quartz.scheduler.rmi.proxy = false
org.quartz.threadPool.class = org.quartz.simpl.SimpleThreadPool
org.quartz.threadPool.threadCount = 3
org.quartz.jobStore.class = org.quartz.simpl.RAMJobStore
# Add this to Configure Quartz to look in the quartz.xml for the job schedules
org.quartz.plugin.jobInitializer.class = org.quartz.plugins.xml.XMLSchedulingDataProcessorPlugin
org.quartz.plugin.jobInitializer.fileNames = quartz.xml
org.quartz.plugin.jobInitializer.failOnFileNotFound = true
org.quartz.plugin.jobInitializer.scanInterval = 120
web.xml
<listener>
<listener-class>
org.quartz.ee.servlet.QuartzInitializerListener
</listener-class>
</listener>
Instead of writing the listener (ServletContextAppListener), we use the built-in org.quartz.ee.servlet.QuartzInitializerListener class to handle the instantiation and starting of the scheduler. You could pass in some init parameters to control the way the Scheduler is created and started. They are explained below.
Make the following entries in web.xml
<context-param>
<param-name>config-file</param-name>
<param-value>quartz.properties</param-value>
</context-param>
<context-param>
<param-name>shutdown-on-unload</param-name>
<param-value>true</param-value>
</context-param>
<context-param>
<param-name>start-on-load</param-name>
<param-value>true</param-value>
</context-param>
<context-param>
<param-name>start-delay-seconds</param-name>
<param-value>10</param-value>
</context-param>
All of the above init parameters are self explanatory. The first parameter points to the config file for Quartz quartz.properties. The last one start-delay-seconds is important in situations where you want the scheduler to start after a certian period of time. Otherwise the jobs may run immediately ( if configured to run so ) on start up of the scheduler. So, it is advisable to give the servlet container and your application some time to settle down before scheduling jobs to run.
If you would like to have the scheduler injected into the ServletContext (as in option 1) you have to set another init parameter like below in web.xml :
<context-param>
<param-name>servlet-context-factory-key</param-name>
<param-value>schedulerFactory</param-value>
</context-param>
You can now access the Scheduler from the ServletContext like below from a servlet:
public class SomeServlet extends HttpServlet {
protected void doGet(HttpServletRequest req, HttpServletResponse resp) {
/* The schedulerFactory was injected into the ServletContext using the init parameters by QuartzInitializerListener */
SchedulerFactory lSchedulerFactory = (SchedulerFactory) .getSession().getServletContext().getAttribute("schedulerFactory");
if(lSchedulerFactory == null ) {
// Should not happen - Log an error and handle it
}
Scheduler lScheduler = null;
/* Get the scheduler from the factory */
try {
lScheduler = lSchedulerFactory.getScheduler();
} catch (SchedulerException pScehdulerException) {
// Should not happen - Log an error and handle it
pScehdulerException.printStackTrace();
}
// Setup the Job class and the Job group
JobDetail jobDetail = new JobDetail("EmailJob", Scheduler.DEFAULT_GROUP, EmailJob.class);
// Create a Trigger that fires every 5 minutes.
Trigger trigger = TriggerUtils.makeMinutelyTrigger(5);
// Setup the Job and Trigger with the Scheduler and schedule jobs
lScheduler.scheduleJob(jobDetail, trigger );
// The servlet execution continues normally independent of the job
....
*) Writing the job class:
Below is a simple example of how to write a job which can be scheduled on the Quartz scheduler.
You can convert a Java class into a Job which can be executed by the scheduler by making it implement the Job interface.
The Job interface is as below:
public interface Job {
public void execute(JobExecutionContext context)
throws JobExecutionException;
}
Implement a Job to send Emails once every 5 minutes.
public class EmailJob implements Job {
/* execute() is called by the scheduler once every 5 minutes */
@Override
public void execute(JobExecutionContext arg0) throws JobExecutionException {
/* Find emails to be sent */
List<Email> lEmailsNotYetSentList = getPendingEmails();
sendEmails(lEmailsNotYetSentList);
}
}
*) Programmatic Vs Declarative scheduling
Jobs can be scheduled to run programatically or using configuration from the XML file. The advantage of using a Declarative approach (XML Config file) is you do not need to rebuild and deploy the application everytime you make a change to the XML Config file. So you can add, delete and modify jobs without rebuilding the application. A restart of the application is all it takes to get the changes working.
The job to schedule is EmailJob. In Quartz, there are 2 basic concepts :
1) Job : Creating the Job is the first step, but to get your Job called by the Scheduler, you need to indicate to the Scheduler how often,and at what time, your Job should be called. <BR>
2) Trigger :This is done by associating a Trigger to the Job. A Trigger has enough information about when to schedule a job. There is a utility class called TriggerUtils which is quite handy to create Triggers.
Option 1) Programmatic scheduling example.
The following example schedules a job from a Servlet. When jobs are started from a Servlet it does not run in the context of
the Servlet. This is one good reason not to create a Thread from a Servlet, which is not considered to be a good practice anyway.That is the reason we inject a reference to the Scheduler in the context initialised callback. Please note that without injecting the scheduler into the ServletContext you wouldn't have had access to it here unless you some other mechanism provided by the servlet container to access such resources.
// Get the scheduler which we setup in the ContextInitialised event
Scheduler lScheduler = (Scheduler)req.getServletContext().getAttribute("scheduler);
JobDetail jobDetail = new JobDetail("EmailJob", Scheduler.DEFAULT_GROUP, EmailJob.class);
// Create a Trigger that fires every 5 minutes.
Trigger trigger = TriggerUtils.makeMinutelyTrigger(5);
// Setup the Job and Trigger with the Scheduler
lScheduler.scheduleJob(jobDetail, trigger );
// The servlet execution continues normally independent of the job
....
Option 2) Declarative scheduling example.
The main reason you would take this approach is, it is easier to deploy the application without going for a a re-build. You can make the changes to the xml config file
and see the results with a restart of the server. In the previous example the job is scheduled from a servlet. It used Java code to setup the Job and Trigger with the Scheduler. The Quartz framework also supports setting up the Job schedule declaratively in XML files. A declarative approach allows us to more quickly modify which Jobs are being executed and when. You could change a job's trigger and make it run every 30 minutes from an hour without changing any source code.
The Quartz framework includes a "plugin" that reads an XML file containing Job and Trigger information upon startup of a Quartz application. All Jobs within the XML are added to the Scheduler, along with their Triggers. You will still have to write those java classes implementing the org.quartz.Job interface to do your work from within the job. Only thing that changes is the schedule these jobs run can be controlled externally via the XML file.
Following is a snapshot of <code>quartz.xml</code> which has a job (email-job) configured to run every 5 minutes using a cron expression. More on cron expressions here - Cron Expression Wiki
<?xml version='1.0' encoding='utf-8'?>
<job-scheduling-data xmlns="http://www.quartz-scheduler.org/xml/JobSchedulingData"
xmlns:xsi="http://www.w3.org/2001/XMLSchema-instance"
xsi:schemaLocation="http://www.quartz-scheduler.org/xml/JobSchedulingData http://www.quartz-scheduler.org/xml/job_scheduling_data_1_8.xsd"
version="1.8">
<schedule>
<job>
<name>email-job</name>
<group>EMAIL_JOBS_GROUP</group>
<description>Creates a PDF and persists the payload to the database</description>
<job-class>jobs.EmailJob</job-class>
<job-data-map>
<entry>
<key>SMTP_HOST</key>
<value>10.x.x.x</value>
</entry>
</job-data-map>
</job>
<trigger>
<cron>
<name>email-trigger</name>
<group>EMAIL_TRIGGERGROUP</group>
<job-name>email-job</job-name>
<job-group>EMAIL_JOBS_GROUP</job-group>
<!-- trigger every 5 minutes !-->
<cron-expression>0 */5 * * * ?</cron-expression>
</cron>
</trigger>
</schedule>
</job-scheduling-data>
The EmailJob is triggered every 5 minutes.
It is a good approach to wrap all the calls to the Quartz API, so that developers do not use it directly. Writing helper classes around the API could be useful for debugging and bookkeeping purposes. Hope this blog helped someone somewhere schedule jobs :) !
Saturday, August 21, 2010
JAXB - Java Architecture for XML Binding - The OXM tool !
JAXB is OXM - Object XML Mapping :) ! it is what ORM is to relational databases.
Hibernate and othe ORM tools is to Databases what JAXB is to XML.
This simple tutorial is for people who are :
1) Sick and tired of parsing XML with/without using any library.
2) Who have never used JAXB and want to get started.
I used to work for a company where we used to un-marshall (parse) XML using a library written in Delphi after installing it into Borland C++ Builder. My manager told me "It is easier to write XML data out than to read it in. If i were you i would have written the code myself". He was right to a certain extent. I wrote the code for writing XML data out to another system and I must say the whole process was quite simple except for the initial few mistakes i made for the tiny XML Writer library.
I used the same XML writer library i built there for a couple of other small hobby projects and it has worked well with not changes needed to the core library. Here's the header file for the simple XML writer library i wrote then.
#ifndef BlueXmlWriterH
#define BlueXmlWriterH
#define START_ANGLE_BRACKET "<"
#define CLOSE_ANGLE_BRACKET ">"
#define BACK_SLASH_MARK "/"
#define SPACE " "
#define EQUAL "="
#define DOUBLE_QUOTE "\""
#include<string>
using namespace std;
class BlueXmlWriter
{
public:
BlueXmlWriter(string &XmlBuffer);
BlueXmlWriter(char *XmlBufferToWriteTo);
bool AddOpeningTag(const char *StartTag);
bool AddOpeningTag(const char *StartTag, const char **attr);
bool AddNode( const char *ElementName, const char *ElementData);
bool AddNode( const char *ElementName, int IntElementData);
bool AddClosingTag(const char *EndTag);
bool AddData(const char *Data);
bool AddData(int Data);
inline int GetBufferSize() { return mXmlBytesWritten; }
char * GetXmlBuffer() { return mXmlBuffer; }
private:
char *mXmlBuffer;
int mXmlBufferSize;
int mXmlBytesWritten;
};
It was used like :
lXmlWriter = new BlueXmlWriter(lBuffer);
lXmlWriter->AddOpeningTag(BLUEMANTRA_START_XML);
lXmlWriter->AddNode(BLUEMANTRA_EVENT,BLUEMANTRA_EV_PRESENCE);
Later on, when i moved on to another company there was this requirement to send and receive XML data to and from a Billing server for charging prepaid mobile customers. Then, i used the DocumentBuilder class to parse the XML , writing XML was still handwritten code (My previous managers advice except that the code was now ported to Java). It worked fine and I found it to have more fine grained control for writing XML when you have your own library.
http://download.oracle.com/javase/1.4.2/docs/api/javax/xml/parsers/DocumentBuilder.html was used for parsing the incoming XML stream. This worked fine too. But it was later on in life that i found JAXB.
I have used JAXB for a web application project and i found it to be immensely helpfull in projects which have a lot of XML marshalling and unmarshalling. The bad news was it does marshalling too - so it was time to say goodbye to my XML Writer library.
The basic steps involved in using JAXB is as follows : (I have compared it to ORM in bold just to help reader relate to it better, if you do not know or have not used any ORM tools before please skip the sentences in bold)
1) You create a XSD (XML Schema definition file) and write your XML Schema. XML Schemas define the structure of your XML. I found this link (XSD Tutorial) to be particularly usefull for writing the XSD myself. I had no clue how to write one before. To relate this to ORM (Object Relational mapping with Hibernate) you create the .hbm.xml file to map classes to tables and columns in the database.
2) Use the binding compiler which comes with JAXB to convert this XML Schema to POJO's which represent your XML Schema definitions.You could relate this to some ORM tools creating the POJO's from the XML file which describes how your classes map to the database table columns.
3) Create the JAXB Context which will be used to create the Marshaller and UnMarshaller. This is equivalent to the creation of a SessionFactory with the database when it comes to ORM.
4) Use the POJO's generated by the binding compiler to marshall and unmarshall the XML.This is similar to retreiving (Reading) and saving (Writing) objects to the databse in ORM.
Ok, lets get started then. For this tutorial we will use the example of a course and the subjects which are part of the course. Let us first try to write the XSD for this. Please read up on this link XML Schema Tutorial if you have no prior experience with XML Schema Definitions.
XSD can be used to describe the XML structure in detail. It can be used to apply constraints to the data in the XML. For example if there is an element called age as <Age>45</Age> we could write the XSD so that the value of Age cannot be outside the range say 0 to 120. And if the XML you are unmarshalling is outside this range you get an exception raised by JAXB. Just imagine the extra code you would have to write to check for such errors.
Moving to our XSD for the Course. A course can have one or more subjects as part of it. We will write the XSD for this relationship as below.
First we describe the Subject. A Subject has a name.
<xs:simpleType name="Subject" >
<xs:restriction base="xs:string" >
<xs:length value="15"/>
</xs:restriction>
</xs:simpleType>
This describes the Subject as a simple type with the data type restricted to a string and the length ( number of characters ) limited to 15. Example could be Geography, Social Studies, length to be less than 15 chars.
Now let us describe the Course in XSD.
<xs:complexType name="Course">
<xs:sequence>
<xs:element name="Name" type="xs:string" minOccurs="1" maxOccurs="1" />
<xs:element name="CSubject" type="Subject" minOccurs="1" maxOccurs="unbounded" />
</xs:sequence>
</xs:complexType>
The above definition of the XML Schema for Course says "Every Course has a name and one or more Subjects".
It has a minimum of one and maximum can be any number, we could have easily restricted the maximum number to 5 with maxOccurs="5". This is how our application.xsd file looks now :
<?xml version="1.0" encoding="UTF-8"?>
<xs:schema xmlns:xs="http://www.w3.org/2001/XMLSchema" >
<!-- XML Elements - This is an XML Comment like /* */ in C/ C++ / Java -->
<xs:element name="CSubject" type="Subject"/>
<xs:element name="CCourse" type="Course"/>
<!-- Defining Subject -->
<xs:simpleType name="Subject" >
<xs:restriction base="xs:string" >
<xs:length value="15"/>
</xs:restriction>
</xs:simpleType>
<!-- Defining Course -->
<xs:complexType name="Course">
<xs:sequence>
<xs:element name="Name" type="xs:string" minOccurs="1" maxOccurs="1" />
<xs:element name="CSubject" type="Subject" minOccurs="1" maxOccurs="unbounded" />
</xs:sequence>
</xs:complexType>
</xs:schema>
Now, all that is left is to generate classes from the XSD and then use them in our application. Let us now use the Binding Compiler to generate the classes for us. The Binding compiler is called xjc and is used as follows.
I found it in my jdk installation directory C:\Program Files\Java\jdk1.6.0_05\bin , I do not remember whether it comes with the standard jdk installation or i copied it from somewhere, in anyways it is quite easy to find this on the internet with a search. So copy it to the bin directory of your jdk installation so that it can be used from anywhere assuming you have the PATH variable set properly.
It takes the .xsd file as input and generates POJO's (Plain Old Java Objects) reperesenting your domain objects plus an ObjectFactory which you would use to create the objects.
C:\eclipseprojects\workspace\JAXB_TEST\src> xjc -nv application.xsd -p jaxb

The command instructs xjc to create the POJO's in a package called jaxb, you could use any package structure like com.xyz.xml.jaxb the compiler will create the directory structure matching your package name.In this case all the generated files go into the jaxb directory.
Here's the xjc generate Course.java file for reference.
/**
* <p>Java class for Course complex type.
*
public class Course {
@XmlElement(name = "Name", required = true)
protected String name;
@XmlElement(name = "CSubject", required = true)
protected List<String> cSubject;
/**
* Gets the value of the name property.
*
* @return
* possible object is
* {@link String }
*
*/
public String getName() {
return name;
}
/**
* Sets the value of the name property.
*
* @param value
* allowed object is
* {@link String }
*
*/
public void setName(String value) {
this.name = value;
}
/**
* Gets the value of the cSubject property.
* For example, to add a new item, do as follows:
* <pre>
* getCSubject().add(newItem);
* </pre>
*
*
* <p>
* Objects of the following type(s) are allowed in the list
* {@link String }
*
*
*/
public List<String> getCSubject() {
if (cSubject == null) {
cSubject = new ArrayList<String>();
}
return this.cSubject;
}
}
Here's ObjectFactory.java
/**
* This object contains factory methods for each
* Java content interface and Java element interface
* generated in the jaxb package.
* <p>An ObjectFactory allows you to programatically
* construct new instances of the Java representation
* for XML content. The Java representation of XML
* content can consist of schema derived interfaces
* and classes representing the binding of schema
* type definitions, element declarations and model
* groups. Factory methods for each of these are
* provided in this class.
*
*/
@XmlRegistry
public class ObjectFactory {
private final static QName _CSubject_QNAME = new QName("", "CSubject");
private final static QName _CCourse_QNAME = new QName("", "CCourse");
/**
* Create a new ObjectFactory that can be used to create new instances of schema derived classes for package: jaxb
*
*/
public ObjectFactory() {
}
/**
* Create an instance of {@link Course }
*
*/
public Course createCourse() {
return new Course();
}
/**
* Create an instance of {@link JAXBElement }{@code <}{@link String }{@code >}}
*
*/
@XmlElementDecl(namespace = "", name = "CSubject")
public JAXBElement<String> createCSubject(String value) {
return new JAXBElement<String>(_CSubject_QNAME, String.class, null, value);
}
/**
* Create an instance of {@link JAXBElement }{@code <}{@link Course }{@code >}}
*
*/
@XmlElementDecl(namespace = "", name = "CCourse")
public JAXBElement<Course> createCCourse(Course value) {
return new JAXBElement<Course>(_CCourse_QNAME, Course.class, null, value);
}
}
Now that we have the domain objects and the factory, all that is left is to use JAXBContext to create a marshaller and marshall some XML data from the domain objects. Back to our example we will create a Course object named "Software Design Patterns" and add subjects called
"Design Principles" , "Creational Patterns" , "Behavioral patterns" ,"Structural Patterns"
MARSHALLING -> XML FROM DOMAIN OBJECTS :
Before we start, as mentioned above we need to create a Marshaller to marshal XML Content from our domain objects using the JAXBContext class.
The JAXBContext class provides the client's entry point to the JAXB API. It provides an abstraction for managing the XML/Java binding information necessary to implement the JAXB binding framework operations: unmarshal, marshal and validate.
lCourse.getCSubject().add("Design Principles");
lCourse.getCSubject().add("Creational Patterns"); /* Subjects in the course */
JAXBElement<Course> lCourse1 = lFactory.createCCourse(lCourse);
try {
lMarshaller.marshal(lCourse1, System.out);
} catch (JAXBException e) {
e.printStackTrace();
The output from the code is below :
Get the name of the course : Software Design Patterns
Get the Subjects count 4
Subject is Design Principles
Subject is Creational Patterns
Subject is Structural Patterns
Subject is Behavioral Patterns
- Voice~Streams
Hibernate and othe ORM tools is to Databases what JAXB is to XML.
This simple tutorial is for people who are :
1) Sick and tired of parsing XML with/without using any library.
2) Who have never used JAXB and want to get started.
I used to work for a company where we used to un-marshall (parse) XML using a library written in Delphi after installing it into Borland C++ Builder. My manager told me "It is easier to write XML data out than to read it in. If i were you i would have written the code myself". He was right to a certain extent. I wrote the code for writing XML data out to another system and I must say the whole process was quite simple except for the initial few mistakes i made for the tiny XML Writer library.
I used the same XML writer library i built there for a couple of other small hobby projects and it has worked well with not changes needed to the core library. Here's the header file for the simple XML writer library i wrote then.
#ifndef BlueXmlWriterH
#define BlueXmlWriterH
#define START_ANGLE_BRACKET "<"
#define CLOSE_ANGLE_BRACKET ">"
#define BACK_SLASH_MARK "/"
#define SPACE " "
#define EQUAL "="
#define DOUBLE_QUOTE "\""
#include<string>
using namespace std;
class BlueXmlWriter
{
public:
BlueXmlWriter(string &XmlBuffer);
BlueXmlWriter(char *XmlBufferToWriteTo);
bool AddOpeningTag(const char *StartTag);
bool AddOpeningTag(const char *StartTag, const char **attr);
bool AddNode( const char *ElementName, const char *ElementData);
bool AddNode( const char *ElementName, int IntElementData);
bool AddClosingTag(const char *EndTag);
bool AddData(const char *Data);
bool AddData(int Data);
inline int GetBufferSize() { return mXmlBytesWritten; }
char * GetXmlBuffer() { return mXmlBuffer; }
private:
char *mXmlBuffer;
int mXmlBufferSize;
int mXmlBytesWritten;
};
It was used like :
lXmlWriter = new BlueXmlWriter(lBuffer);
lXmlWriter->AddOpeningTag(BLUEMANTRA_START_XML);
lXmlWriter->AddNode(BLUEMANTRA_EVENT,BLUEMANTRA_EV_PRESENCE);
Later on, when i moved on to another company there was this requirement to send and receive XML data to and from a Billing server for charging prepaid mobile customers. Then, i used the DocumentBuilder class to parse the XML , writing XML was still handwritten code (My previous managers advice except that the code was now ported to Java). It worked fine and I found it to have more fine grained control for writing XML when you have your own library.
http://download.oracle.com/javase/1.4.2/docs/api/javax/xml/parsers/DocumentBuilder.html was used for parsing the incoming XML stream. This worked fine too. But it was later on in life that i found JAXB.
I have used JAXB for a web application project and i found it to be immensely helpfull in projects which have a lot of XML marshalling and unmarshalling. The bad news was it does marshalling too - so it was time to say goodbye to my XML Writer library.
The basic steps involved in using JAXB is as follows : (I have compared it to ORM in bold just to help reader relate to it better, if you do not know or have not used any ORM tools before please skip the sentences in bold)
1) You create a XSD (XML Schema definition file) and write your XML Schema. XML Schemas define the structure of your XML. I found this link (XSD Tutorial) to be particularly usefull for writing the XSD myself. I had no clue how to write one before. To relate this to ORM (Object Relational mapping with Hibernate) you create the .hbm.xml file to map classes to tables and columns in the database.
2) Use the binding compiler which comes with JAXB to convert this XML Schema to POJO's which represent your XML Schema definitions.You could relate this to some ORM tools creating the POJO's from the XML file which describes how your classes map to the database table columns.
3) Create the JAXB Context which will be used to create the Marshaller and UnMarshaller. This is equivalent to the creation of a SessionFactory with the database when it comes to ORM.
4) Use the POJO's generated by the binding compiler to marshall and unmarshall the XML.This is similar to retreiving (Reading) and saving (Writing) objects to the databse in ORM.
Ok, lets get started then. For this tutorial we will use the example of a course and the subjects which are part of the course. Let us first try to write the XSD for this. Please read up on this link XML Schema Tutorial if you have no prior experience with XML Schema Definitions.
XSD can be used to describe the XML structure in detail. It can be used to apply constraints to the data in the XML. For example if there is an element called age as <Age>45</Age> we could write the XSD so that the value of Age cannot be outside the range say 0 to 120. And if the XML you are unmarshalling is outside this range you get an exception raised by JAXB. Just imagine the extra code you would have to write to check for such errors.
Moving to our XSD for the Course. A course can have one or more subjects as part of it. We will write the XSD for this relationship as below.
First we describe the Subject. A Subject has a name.
<xs:simpleType name="Subject" >
<xs:restriction base="xs:string" >
<xs:length value="15"/>
</xs:restriction>
</xs:simpleType>
This describes the Subject as a simple type with the data type restricted to a string and the length ( number of characters ) limited to 15. Example could be Geography, Social Studies, length to be less than 15 chars.
Now let us describe the Course in XSD.
<xs:complexType name="Course">
<xs:sequence>
<xs:element name="Name" type="xs:string" minOccurs="1" maxOccurs="1" />
<xs:element name="CSubject" type="Subject" minOccurs="1" maxOccurs="unbounded" />
</xs:sequence>
</xs:complexType>
The above definition of the XML Schema for Course says "Every Course has a name and one or more Subjects".
It has a minimum of one and maximum can be any number, we could have easily restricted the maximum number to 5 with maxOccurs="5". This is how our application.xsd file looks now :
<?xml version="1.0" encoding="UTF-8"?>
<xs:schema xmlns:xs="http://www.w3.org/2001/XMLSchema" >
<!-- XML Elements - This is an XML Comment like /* */ in C/ C++ / Java -->
<xs:element name="CSubject" type="Subject"/>
<xs:element name="CCourse" type="Course"/>
<!-- Defining Subject -->
<xs:simpleType name="Subject" >
<xs:restriction base="xs:string" >
<xs:length value="15"/>
</xs:restriction>
</xs:simpleType>
<!-- Defining Course -->
<xs:complexType name="Course">
<xs:sequence>
<xs:element name="Name" type="xs:string" minOccurs="1" maxOccurs="1" />
<xs:element name="CSubject" type="Subject" minOccurs="1" maxOccurs="unbounded" />
</xs:sequence>
</xs:complexType>
</xs:schema>
Now, all that is left is to generate classes from the XSD and then use them in our application. Let us now use the Binding Compiler to generate the classes for us. The Binding compiler is called xjc and is used as follows.
I found it in my jdk installation directory C:\Program Files\Java\jdk1.6.0_05\bin , I do not remember whether it comes with the standard jdk installation or i copied it from somewhere, in anyways it is quite easy to find this on the internet with a search. So copy it to the bin directory of your jdk installation so that it can be used from anywhere assuming you have the PATH variable set properly.
It takes the .xsd file as input and generates POJO's (Plain Old Java Objects) reperesenting your domain objects plus an ObjectFactory which you would use to create the objects.
C:\eclipseprojects\workspace\JAXB_TEST\src> xjc -nv application.xsd -p jaxb

The command instructs xjc to create the POJO's in a package called jaxb, you could use any package structure like com.xyz.xml.jaxb the compiler will create the directory structure matching your package name.In this case all the generated files go into the jaxb directory.
Here's the xjc generate Course.java file for reference.
/**
* <p>Java class for Course complex type.
*
public class Course {
@XmlElement(name = "Name", required = true)
protected String name;
@XmlElement(name = "CSubject", required = true)
protected List<String> cSubject;
/**
* Gets the value of the name property.
*
* @return
* possible object is
* {@link String }
*
*/
public String getName() {
return name;
}
/**
* Sets the value of the name property.
*
* @param value
* allowed object is
* {@link String }
*
*/
public void setName(String value) {
this.name = value;
}
/**
* Gets the value of the cSubject property.
* For example, to add a new item, do as follows:
* <pre>
* getCSubject().add(newItem);
* </pre>
*
*
* <p>
* Objects of the following type(s) are allowed in the list
* {@link String }
*
*
*/
public List<String> getCSubject() {
if (cSubject == null) {
cSubject = new ArrayList<String>();
}
return this.cSubject;
}
}
Here's ObjectFactory.java
* This object contains factory methods for each
* Java content interface and Java element interface
* generated in the jaxb package.
* <p>An ObjectFactory allows you to programatically
* construct new instances of the Java representation
* for XML content. The Java representation of XML
* content can consist of schema derived interfaces
* and classes representing the binding of schema
* type definitions, element declarations and model
* groups. Factory methods for each of these are
* provided in this class.
*
*/
@XmlRegistry
public class ObjectFactory {
private final static QName _CSubject_QNAME = new QName("", "CSubject");
private final static QName _CCourse_QNAME = new QName("", "CCourse");
/**
* Create a new ObjectFactory that can be used to create new instances of schema derived classes for package: jaxb
*
*/
public ObjectFactory() {
}
/**
* Create an instance of {@link Course }
*
*/
public Course createCourse() {
return new Course();
}
/**
* Create an instance of {@link JAXBElement }{@code <}{@link String }{@code >}}
*
*/
@XmlElementDecl(namespace = "", name = "CSubject")
public JAXBElement<String> createCSubject(String value) {
return new JAXBElement<String>(_CSubject_QNAME, String.class, null, value);
}
/**
* Create an instance of {@link JAXBElement }{@code <}{@link Course }{@code >}}
*
*/
@XmlElementDecl(namespace = "", name = "CCourse")
public JAXBElement<Course> createCCourse(Course value) {
return new JAXBElement<Course>(_CCourse_QNAME, Course.class, null, value);
}
}
Now that we have the domain objects and the factory, all that is left is to use JAXBContext to create a marshaller and marshall some XML data from the domain objects. Back to our example we will create a Course object named "Software Design Patterns" and add subjects called
"Design Principles" , "Creational Patterns" , "Behavioral patterns" ,"Structural Patterns"
MARSHALLING -> XML FROM DOMAIN OBJECTS :
Before we start, as mentioned above we need to create a Marshaller to marshal XML Content from our domain objects using the JAXBContext class.
The JAXBContext class provides the client's entry point to the JAXB API. It provides an abstraction for managing the XML/Java binding information necessary to implement the JAXB binding framework operations: unmarshal, marshal and validate.
// jaxb is the package (directory) where all our xjc generated files reside
JAXBContext mJAXBContextInstance = JAXBContext.newInstance( "jaxb" );
// create the Marshaller
Marshaller lMarshaller = mJAXBContextInstance.createMarshaller();
/* Create the domain object factory */
ObjectFactory lFactory = new ObjectFactory();
/* Create the Course object */
Course lCourse = lFactory.createCourse(); /* We can use new Course() instead */
lCourse.setCName("Software Design Patterns"); /* Name of the course */
lCourse.getCSubject().add("Design Principles");
lCourse.getCSubject().add("Creational Patterns"); /* Subjects in the course */
lCourse.getCSubject().add("Structural Patterns");
lCourse.getCSubject().add("Behavioral Patterns");
/* The following line of code is needed to marshall the domain object into XML format, without this
the Marshalling fails */
JAXBElement<Course> lCourse1 = lFactory.createCCourse(lCourse);
try {
lMarshaller.marshal(lCourse1, System.out);
} catch (JAXBException e) {
e.printStackTrace();
}
The output from running this code is :
<?xml version="1.0" encoding="UTF-8" standalone="yes"?>
<CCourse>
<Name>Software Design Patterns</Name>
<CSubject>Design Principles</CSubject>
<CSubject>Creational Patterns</CSubject>
<CSubject>Structural Patterns</CSubject>
<CSubject>Behavioral Patterns</CSubject>
</CCourse>
Isn't this cool ? We have NOT written a line of code to build the XML Content we are seeing here. It is all taken care by JAXB.
UNMARSHALING -> DOMAIN OBJECTS FROM XML :
Similarly unmarshalling XML to Domain objects works the same way you create an UnMarshaller using the JAXBContext class.
UNMARSHALING -> DOMAIN OBJECTS FROM XML :
Similarly unmarshalling XML to Domain objects works the same way you create an UnMarshaller using the JAXBContext class.
We have our Course.xml here as below :
<?xml version="1.0" encoding="UTF-8" standalone="yes"?>
<CCourse>
<Name>Software Design Patterns</Name>
<CSubject>Design Principles</CSubject>
<CSubject>Creational Patterns</CSubject>
<CSubject>Structural Patterns</CSubject>
<CSubject>Behavioral Patterns</CSubject>
</CCourse>
We will create an UnMarshaller and parse this XML file to domain objects. Code follows :
JAXBContext lContext = null;
Unmarshaller lUnMarshaller = null;
try {
lContext = JAXBContext.newInstance("jaxb");
lUnMarshaller = lContext.createUnmarshaller();
} catch (JAXBException e) {
e.printStackTrace();
}
FileReader lReader = null;
try {
lReader = new FileReader(new File("Course.xml"));
} catch (FileNotFoundException e) {
// TODO Auto-generated catch block
e.printStackTrace();
}
try {
JAXBElement<Course> lCourse2 = (JAXBElement<Course>) lUnMarshaller.unmarshal(lReader);
Course lCourse3 = lCourse2.getValue();
System.out.println("Get the name of the course : " + lCourse3.getName());
System.out.println("Get the Subjects count " + lCourse3.getCSubject().size());
Iterator<String> lIter = lCourse3.getCSubject().iterator();
while(lIter.hasNext()) {
System.out.println("Subject is " + lIter.next());
}
}
try {
lContext = JAXBContext.newInstance("jaxb");
lUnMarshaller = lContext.createUnmarshaller();
} catch (JAXBException e) {
e.printStackTrace();
}
FileReader lReader = null;
try {
lReader = new FileReader(new File("Course.xml"));
} catch (FileNotFoundException e) {
// TODO Auto-generated catch block
e.printStackTrace();
}
try {
JAXBElement<Course> lCourse2 = (JAXBElement<Course>) lUnMarshaller.unmarshal(lReader);
Course lCourse3 = lCourse2.getValue();
System.out.println("Get the name of the course : " + lCourse3.getName());
System.out.println("Get the Subjects count " + lCourse3.getCSubject().size());
Iterator<String> lIter = lCourse3.getCSubject().iterator();
while(lIter.hasNext()) {
System.out.println("Subject is " + lIter.next());
}
}
}
The output from the code is below :
Get the name of the course : Software Design Patterns
Get the Subjects count 4
Subject is Design Principles
Subject is Creational Patterns
Subject is Structural Patterns
Subject is Behavioral Patterns
That's it we UnMarshalled (parsed) the XML file into our domain object Course and we saw that the properties of the Course object automagically populated with the contents by JAXB.
FINAL THOUGHTS :
JAXB is a very handy tool to manipulate XML Content use it in large projects and when the XML structure changes you do not need to write any code, just run xjc again on the new XSD. We have just seen some parts of JAXB, there are features to handle errors dynamically. We saw how to Marshall and UnMarshal XML , there are options to validate the XML as well . Hope this blog helped you with JAXB.
- Voice~Streams
Thursday, July 22, 2010
HOWTO - Create an executable jar file.
This blog explains how to create an executable jar file.I have often run my java programs using the dot separated package structure. For example : java com.devicemantra.apps.blueapp.Main, it looked akward and complicated. Wanted to run it like java -jar blueapp.jar. Finally had some time to check this out. It is a simple process and involves creating a Manifest file and familiarity with the jar command. Both are simple.
This is the directory structure of my java project in Eclipse IDE.
src
|_ com.san.app
|_LoggerServer.java ---> main() is defined here.
|_NetworkFileLogger.java
|_com.san.logger
|_Logger.java
|_LoggerImpl.java
|_LoggerFactory.java
|_SanLoggerException.java
|_com.san.network
|_NetworkListener.java
|_NetworkListenerImpl.java
|_NetworkListenerFactory.java
|_SanNetworkException.java
The directory structure is shown. A sanpshot from my Eclipse IDE.
Assuming all your class files are in the same directory structure as your source files. Snapshot of my directory structure.
bin
|_ com
|_san
|_app
|_LoggerServer.class
|_NetworkFileLogger.class (etc)
|_logger
|_network
Now assuming that you are at the top level directory bin of your class files. Create a new file MANIFEST.MF in the bin directory as follows using your favorite text editor. I used gvim for windows.

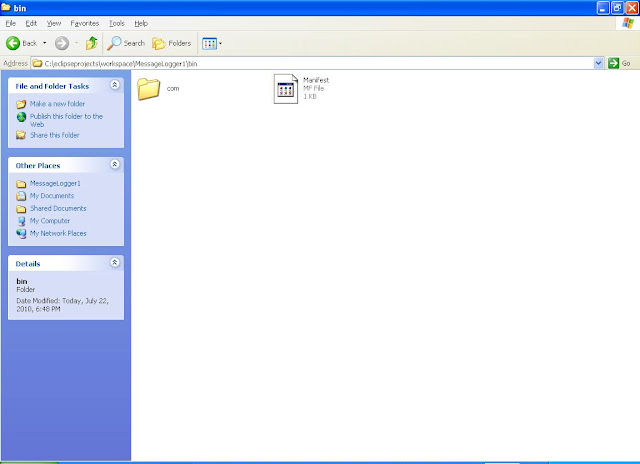
Notice the marking. It is going to indicate the class which has main() defined among all the classes and the class file to run when the jar file is executed. I have added the Main-Class property.Now let us create the jar file.This is how your directory structure should look like now. bin directory looks like below.
Now, create the jar file by including the Manifest.mf file which we created using the following command.
jar -cvfm LoggerServer.jar MANIFEST.MF com
Let me explain the jar command. jar command is similar to tar command used generally on UNIX like systems . It creates an archive. In this case it says - create an archive be verbose, name the file LoggerServer.jar and include the manifest file which is MANIFEST.MF , include all the class files under the com directory and it's sub directories while creating this jar.

The ServerLogger.jar is now executable from the command line as follows :
java -jar LoggerServer.jar
This is possible only because we have added a MANIFEST.MF file indicates which is the main class in the jar.
Any arguments can be passed to main as below :
java -jar LoggerServer.jar 8888

That's it. Hope this blog helped someone somewhere create their first executable jar.
This is the directory structure of my java project in Eclipse IDE.
src
|_ com.san.app
|_LoggerServer.java ---> main() is defined here.
|_NetworkFileLogger.java
|_com.san.logger
|_Logger.java
|_LoggerImpl.java
|_LoggerFactory.java
|_SanLoggerException.java
|_com.san.network
|_NetworkListener.java
|_NetworkListenerImpl.java
|_NetworkListenerFactory.java
|_SanNetworkException.java
The directory structure is shown. A sanpshot from my Eclipse IDE.
 |
Assuming all your class files are in the same directory structure as your source files. Snapshot of my directory structure.
bin
|_ com
|_san
|_app
|_LoggerServer.class
|_NetworkFileLogger.class (etc)
|_logger
|_network
Now assuming that you are at the top level directory bin of your class files. Create a new file MANIFEST.MF in the bin directory as follows using your favorite text editor. I used gvim for windows.

Notice the marking. It is going to indicate the class which has main() defined among all the classes and the class file to run when the jar file is executed. I have added the Main-Class property.Now let us create the jar file.This is how your directory structure should look like now. bin directory looks like below.

Now, create the jar file by including the Manifest.mf file which we created using the following command.
jar -cvfm LoggerServer.jar MANIFEST.MF com
Let me explain the jar command. jar command is similar to tar command used generally on UNIX like systems . It creates an archive. In this case it says - create an archive be verbose, name the file LoggerServer.jar and include the manifest file which is MANIFEST.MF , include all the class files under the com directory and it's sub directories while creating this jar.
'c' - create new archive
'v' - verbose
'f' - file name - LoggerServe.jar in this case.
'm' - include manifest information from specified manifest file.
The ServerLogger.jar is now executable from the command line as follows :
java -jar LoggerServer.jar
This is possible only because we have added a MANIFEST.MF file indicates which is the main class in the jar.
Any arguments can be passed to main as below :
java -jar LoggerServer.jar 8888

That's it. Hope this blog helped someone somewhere create their first executable jar.
Wednesday, July 7, 2010
Java: Enhanced for loop and Array puzzle.
I have done a lot of programming related puzzles as a student and professional for fun or for taking tests. But this seemingly innocent and straightforward looking piece of code stumped me ! I had to actually try this out in Eclipse running in debug mode to Watch the variables. Now when i figured what is happening it looks straightforward.
The reason why i could not figure this out is first of all :
1) It looked straightforward ( overconfidence stepped in )
2) I was used to the for(int counter = 0; counter< ...; counter++) way of writing for loops and indexing arrays.
Whatever said, this one was a good puzzle. And i will NOT forget this one all my life :) !
By the way the output is : 0030
The reason why i could not figure this out is first of all :
1) It looked straightforward ( overconfidence stepped in )
2) I was used to the for(int counter = 0; counter< ...; counter++) way of writing for loops and indexing arrays.
Whatever said, this one was a good puzzle. And i will NOT forget this one all my life :) !
public class Main {
public static void main(String... pArgv) {
int []arr = {1,2,3,4};
for ( int i : arr )
{
arr[i] = 0;
}
for ( int i : arr )
{
System.out.print(i);
}
}
}
public static void main(String... pArgv) {
int []arr = {1,2,3,4};
for ( int i : arr )
{
arr[i] = 0;
}
for ( int i : arr )
{
System.out.print(i);
}
}
}
By the way the output is : 0030
Wednesday, June 30, 2010
Confusing Stack Iterator.
I was using the Stack<E> class from the Java Collections framework for the first time. I think the Iterator returned by this Collection is confusing. Consider the following code :
I was hoping that the output from the above code would be :
THREE
TWO
ONE
But, the output was :
ONE
TWO
THREE
The reason why i expect it to be like the first output shown above is - It is a Stack and a Stack orders elements in a Last In First Out (LIFO) manner. Hence the Iterator returned from the call lStack.Iterator() should preserve this ordering. Am I missing something obvious ?
import java.util.Iterator;
import java.util.Stack;
public class Main {
public static void main(String[] argv) {
Stack<String> lStack = new Stack<String>();
lStack.add("ONE");
lStack.add("TWO");
lStack.add("THREE");
Iterator<String> lIterator = lStack.iterator();
while ( lIterator.hasNext() ) {
System.out.println( lIterator.next());
}
}
}
import java.util.Stack;
public class Main {
public static void main(String[] argv) {
Stack<String> lStack = new Stack<String>();
lStack.add("ONE");
lStack.add("TWO");
lStack.add("THREE");
Iterator<String> lIterator = lStack.iterator();
while ( lIterator.hasNext() ) {
System.out.println( lIterator.next());
}
}
}
I was hoping that the output from the above code would be :
THREE
TWO
ONE
But, the output was :
ONE
TWO
THREE
The reason why i expect it to be like the first output shown above is - It is a Stack and a Stack orders elements in a Last In First Out (LIFO) manner. Hence the Iterator returned from the call lStack.Iterator() should preserve this ordering. Am I missing something obvious ?
Friday, June 25, 2010
blueipd - The public IP Address finder daemon
There are times when I had to figure out the public IP address of the network i was in.This blog describes a daemon which i had developed for personal use. This daemon can be installed to run at startup on Linux. I called it blueipd. blueipd periodically sends a request to the server with date and time in xml format. The server looks at the HTTP headers of the request and figures out the Public Ip address of my office router.
There is php script on the server which formats and displays this in a presentable format. The php script can be enhanced to send an SMS/Email to a precofigured mobile number/Email Address when there is a change in Ip address. In short, you could look up a particular server url and figure out the public ip address of the network where blueipd is running from.
The code for blueipd , the initscript and the Makefile is available for download from www.devicemantra.com at this url Download
Otherwise i had no way of finding out my office public ip, blueipd is really a very helpfull utility. It could also be used to do ssh logins by looking up the ip address and of course adding a port mapping on your office router.
blueipd - Directory structure.
The code is split into the following directory structure:
ipaddressdaemon
- initscript
-src
- app
- bluehttp
- bluelogger
- bluexml
- include
- Makefile
First let us look at the main code for the daemon and go through it step by step.
blueapp.cpp
The main loop for the daemon
#include<string>
#include<iostream>
using namespace std;
#include<stdlib.h>
#include<unistd.h>
#include<signal.h>
#include<syslog.h>
/* Application includes */
#include<bluemantra.h>
#include<bluehttppost.h>
#include<bluexml/bluexmlbuilder.h>
#define BLUEMANTRA_FORM_CONTENT_TYPE "application/xml"
#define BLUEMANTRA_INTERVAL 3600
bool bDoExit = false;
void daemonize()
{
/* Start logging to the syslog daemon */
openlog(" blueipd ",LOG_PID,LOG_DAEMON);
syslog(LOG_INFO,"Started .....");
/* First check whether we are a daemon already ? */
if( 1 == getpid() )
{
//"Already a daemon pid = "<<getpid()<<endl;
return;
}
pid_t pid = fork();
/* Handle fork failure */
if( pid < 0 )
{
syslog(LOG_INFO,"Fork failed exiting ..");
exit(-1);
}
if( pid > 0 )
{
syslog(LOG_INFO,"Parent process exiting ..");
exit(0);
}
/* From now on it is the child which is executing */
/* Let us install a SIGNAL handler */
signal(SIGTERM,SIG_IGN);
signal(SIGHUP,SIG_IGN);
/* First let us close all the open file descriptors */
for (int count = getdtablesize();count >=0 ; count--)
{
close(count); /* close all descriptors */
}
/* Change the session id for this process */
setsid();
/* Start logging to the syslog daemon */
openlog(" blueipd ",LOG_PID,LOG_DAEMON);
BLUEMANTRA_RESULT lResult;
int lCount=1;
while( false == bDoExit )
{
syslog(LOG_INFO,"Executing Main loop");
BlueXmlBuilder *lXmlBuilder = new BlueXmlBuilder();
string lXmlStr = "";
BlueHttpPost *lPoster = new BlueHttpPost();
lPoster->SetUrl(BLUEMANTRA_POST_URL);
syslog(LOG_INFO, "[SUCCESS] Posting to www.devicemantra.com");
}
else
{
syslog(LOG_ERR, "[ERROR] Posting to www.devicemantra.com");
}
delete lXmlBuilder;
delete lPoster;
syslog(LOG_INFO,"Finished executing loop");
/* Let us sleep for some time now */
sleep(BLUEMANTRA_INTERVAL);
}
}
int main()
{
daemonize();
}
blueapp.cpp - Code walkthrough
The code for the main loop is quite straight forward. The important parts are highlighted. The daemonize function does all the work.
The script queries the database for the ip address blueipd has updated. Then redirects (302 HTTP response) the page to that ip and port number.
There is php script on the server which formats and displays this in a presentable format. The php script can be enhanced to send an SMS/Email to a precofigured mobile number/Email Address when there is a change in Ip address. In short, you could look up a particular server url and figure out the public ip address of the network where blueipd is running from.
The code for blueipd , the initscript and the Makefile is available for download from www.devicemantra.com at this url Download
A use case for blueipd
I had an application server running on my PC at office on port 8888. This PC was in a LAN. I wanted to devise a way to access this server from home by typing in a url like www.devicemantra.com/myappserver. This script looks up the database and finds out the current public ip address of my office which was updated by blueipd. It then redirects (HTTP 302 Status code) me to the public ip and port number 8888. I had mapped (port mapped) my office routers port 8888 to an internal ip address and port number ( 192.168.1.2222 and port 8888). So all connections coming on 8888 are now redirected to my office PC's application server. And now, i can reach it with one permanent url !Otherwise i had no way of finding out my office public ip, blueipd is really a very helpfull utility. It could also be used to do ssh logins by looking up the ip address and of course adding a port mapping on your office router.
The code is split into the following directory structure:
ipaddressdaemon
- initscript
-src
- app
- bluehttp
- bluelogger
- bluexml
- include
- Makefile
First let us look at the main code for the daemon and go through it step by step.
blueapp.cpp
The main loop for the daemon
#include<string>
#include<iostream>
using namespace std;
#include<stdlib.h>
#include<unistd.h>
#include<signal.h>
#include<syslog.h>
/* Application includes */
#include<bluemantra.h>
#include<bluehttppost.h>
#include<bluexml/bluexmlbuilder.h>
#define BLUEMANTRA_POST_URL "http://www.devicemantra.com/bluemantra/time_update.php"
#define BLUEMANTRA_FORM_NAME "time"#define BLUEMANTRA_FORM_CONTENT_TYPE "application/xml"
#define BLUEMANTRA_INTERVAL 3600
bool bDoExit = false;
void daemonize()
{
/* Start logging to the syslog daemon */
openlog(" blueipd ",LOG_PID,LOG_DAEMON);
syslog(LOG_INFO,"Started .....");
/* First check whether we are a daemon already ? */
if( 1 == getpid() )
{
//"Already a daemon pid = "<<getpid()<<endl;
return;
}
pid_t pid = fork();
/* Handle fork failure */
if( pid < 0 )
{
syslog(LOG_INFO,"Fork failed exiting ..");
exit(-1);
}
if( pid > 0 )
{
syslog(LOG_INFO,"Parent process exiting ..");
exit(0);
}
/* From now on it is the child which is executing */
/* Let us install a SIGNAL handler */
signal(SIGTERM,SIG_IGN);
signal(SIGHUP,SIG_IGN);
/* First let us close all the open file descriptors */
for (int count = getdtablesize();count >=0 ; count--)
{
close(count); /* close all descriptors */
}
/* Change the session id for this process */
setsid();
/* Start logging to the syslog daemon */
openlog(" blueipd ",LOG_PID,LOG_DAEMON);
BLUEMANTRA_RESULT lResult;
int lCount=1;
while( false == bDoExit )
{
syslog(LOG_INFO,"Executing Main loop");
BlueXmlBuilder *lXmlBuilder = new BlueXmlBuilder();
string lXmlStr = "";
BlueHttpPost *lPoster = new BlueHttpPost();
lPoster->SetUrl(BLUEMANTRA_POST_URL);
lXmlBuilder->GetTimeInXml(lXmlStr);
if(BLUEMANTRA_SUCCESS == lPoster->Post(BLUEMANTRA_FORM_NAME, lXmlStr, BLUEMANTRA_FORM_CONTENT_TYPE))
{syslog(LOG_INFO, "[SUCCESS] Posting to www.devicemantra.com");
}
else
{
syslog(LOG_ERR, "[ERROR] Posting to www.devicemantra.com");
}
delete lXmlBuilder;
delete lPoster;
syslog(LOG_INFO,"Finished executing loop");
/* Let us sleep for some time now */
sleep(BLUEMANTRA_INTERVAL);
}
}
int main()
{
daemonize();
}
The code for the main loop is quite straight forward. The important parts are highlighted. The daemonize function does all the work.
- It first forks to create a child process.
- Installs some signal handlers to handle ignore SIGTERM, SIGHUP signals delivered to it.
- Closes all file descriptors for the child process.
- setsid() call detached the process from the parent and controlling terminal.
- Create a BlueXmlBuilder and BlueHttpPost (Helper classes for building XML and HTTP request objects, please download and check the code for more) objects.
- Post to the server url.
- Sleep for a predefined interval.
Note: Steps 1 to 4 can be used to write any simple daemon.
Installing blueipd on your system.
1) Download the C++ source + init scripts + php script together from this link - Download.
2) Unzip it to the directory ipaddressdaemon in your home directory.
3) run the make command in the src directory.
4) If everything went fine you will find blueipd (executable in the src/app directory).
5) Copy blueipd to /usr/bin as root.
6) Copy ipaddressdaemon/initscript/blueipd to /etc/rc.d/init.d/ directory.
7) chkconfig --add blueipd adds the blueipd daemon to services.
8) chkconfig --level 345 blueipd on - enables blueipd in runlevels 3,4 and 5.
9) service blueipd start - should start the blueipd daemon on your system.
The only thing that is left to be done is uploading the script to the web server and pointing to that url from the blueipd.
Installing the php script on the server
<?
$time_xml = $_POST['time'];
$pa_public_ip = $_SERVER['REMOTE_ADDR'];
$domain = GetHostByName($REMOTE_ADDR);
if (isset($_SERVER["HTTP_X_FORWARDED_FOR"]))
{
$pa_public_ip = $_SERVER["HTTP_X_FORWARDED_FOR"];
}
else
{
$pa_public_ip = $_SERVER["REMOTE_ADDR"];
}
$time_xml = $_POST['time'];
$pa_public_ip = $_SERVER['REMOTE_ADDR'];
$domain = GetHostByName($REMOTE_ADDR);
if (isset($_SERVER["HTTP_X_FORWARDED_FOR"]))
{
$pa_public_ip = $_SERVER["HTTP_X_FORWARDED_FOR"];
}
else
{
$pa_public_ip = $_SERVER["REMOTE_ADDR"];
}
The above php script logs the public ip address in the database. The code is self explanatory but not well structured ! I feel such code does not need undue attention !
- The code retreives the the Public ip address by looking at the incoming post request $pa_public_ip = $_SERVER['REMOTE_ADDR'];
$domain = GetHostByName($REMOTE_ADDR);
if (isset($_SERVER["HTTP_X_FORWARDED_FOR"]))
{
$pa_public_ip = $_SERVER["HTTP_X_FORWARDED_FOR"];
}
else
{
$pa_public_ip = $_SERVER["REMOTE_ADDR"];
}
That is all there is to it. It is a very simple script the actual script does more like logging it to the database and updating the time etc. That part can be added by anyone with a little knowledge of php or any scripting language for that matter and mysql.
The blueipd init script. ( I modified vsftpd init script for this one ).
#!/bin/bash
#
### BEGIN INIT INFO
# Provides: blueipd
# Short-Description: blueipd Daemon
# Description: blueipd is a public ip address finder daemon.
### END INIT INFO
# Source function library.
. /etc/rc.d/init.d/functions
# Source networking configuration.
. /etc/sysconfig/network
RETVAL=0
prog="blueipd"
start() {
# Start daemons.
# Check that networking is up.
[ ${NETWORKING} = "no" ] && exit 1
if [ -f /usr/bin/blueipd ] ; then
echo -n $"Starting $prog for $site: "
daemon /usr/bin/blueipd
RETVAL=$?
[ $RETVAL -eq 0 ] && touch /var/lock/subsys/$prog
echo
done
else
RETVAL=1
fi
return $RETVAL
}
stop() {
# Stop daemons.
echo -n $"Shutting down $prog: "
killproc $prog
RETVAL=$?
echo
[ $RETVAL -eq 0 ] && rm -f /var/lock/subsys/$prog
return $RETVAL
}
# See how we were called.
case "$1" in
start)
start
;;
stop)
stop
;;
restart|reload)
stop
start
RETVAL=$?
;;
condrestart)
if [ -f /var/lock/subsys/$prog ]; then
stop
start
RETVAL=$?
fi
;;
status)
status $prog
RETVAL=$?
;;
*)
echo $"Usage: $0 {start|stop|restart|condrestart|status}"
exit 1
esac
exit $RETVAL
#
### BEGIN INIT INFO
# Provides: blueipd
# Short-Description: blueipd Daemon
# Description: blueipd is a public ip address finder daemon.
### END INIT INFO
# Source function library.
. /etc/rc.d/init.d/functions
# Source networking configuration.
. /etc/sysconfig/network
RETVAL=0
prog="blueipd"
start() {
# Start daemons.
# Check that networking is up.
[ ${NETWORKING} = "no" ] && exit 1
if [ -f /usr/bin/blueipd ] ; then
echo -n $"Starting $prog for $site: "
daemon /usr/bin/blueipd
RETVAL=$?
[ $RETVAL -eq 0 ] && touch /var/lock/subsys/$prog
echo
done
else
RETVAL=1
fi
return $RETVAL
}
stop() {
# Stop daemons.
echo -n $"Shutting down $prog: "
killproc $prog
RETVAL=$?
echo
[ $RETVAL -eq 0 ] && rm -f /var/lock/subsys/$prog
return $RETVAL
}
# See how we were called.
case "$1" in
start)
start
;;
stop)
stop
;;
restart|reload)
stop
start
RETVAL=$?
;;
condrestart)
if [ -f /var/lock/subsys/$prog ]; then
stop
start
RETVAL=$?
fi
;;
status)
status $prog
RETVAL=$?
;;
*)
echo $"Usage: $0 {start|stop|restart|condrestart|status}"
exit 1
esac
exit $RETVAL
The redirect script
Name : myappserver.php
This script redirects to my appserver when you access this url from a browser.
Upload this script to your server. There has to be a port mapping on port 4444 on your office router to your appserver / Other Applications ip address and port.
Name : myappserver.php
This script redirects to my appserver when you access this url from a browser.
Upload this script to your server. There has to be a port mapping on port 4444 on your office router to your appserver / Other Applications ip address and port.
<?php
 /* Open connection to the database */
   include '../library/config_bm.php';
 include '../library/opendb.php';

 header("Cache-Control: no-cache, must-revalidate"); // HTTP/1.1
 header("Expires: Sat, 26 Jul 1997 05:00:00 GMT"); // Date in the past

 $select_sql = "SELECT * from public_ip_table LIMIT 1;";
 $result = mysql_query($select_sql) or die('Query failed.'. mysql_error());

 $num_rows = mysql_num_rows($result);
 if( $num_rows > 0 )
       {
         /* Check the details */
           $row = mysql_fetch_row($result);
         $redirect_address = "Location:"."http://".$row[1].":4444";
         header($redirect_address);       }else {
echo "FAILED: to fetch public ip ";
}
?>
The script queries the database for the ip address blueipd has updated. Then redirects (302 HTTP response) the page to that ip and port number.
I hope there is enough information to implement this Public Ip Address daemon and have it working for you. Please use this link to download the code and see it for yourself. Good luck !
For any questions or feedback please send an email to amithmit (at) yahoo (dot) com.
- Voice~Streams
Subscribe to:
Posts (Atom)